Last updated on June 25th, 2024 at 09:20 am
We recently completed a project that’s just too exciting to keep to ourselves. Our end customer asked us to fabricate a sandblasting unit for use in industrial manufacturing.
Want to know how we transformed this project from a concept into an APPROVED prototype? Here’s a peek into our process at Approved Sheet Metal.
Table of Contents
- 1 Sheet Metal Design for Manufacturing
- 2 Notching, Tabbing, and Rolling a Complex Part FAQ
- 2.0.1 What was the first step in the fabrication process of the sandblasting unit for industrial manufacturing?
- 2.0.2 How were notching, tabbing, and welding addressed in the fabrication of the sandblasting unit?
- 2.0.3 What method was used to fabricate the main body of the sandblasting unit?
- 2.0.4 How long did it take to complete the sandblasting unit prototype, and what was the feedback from the end-user?
- 2.0.5 Can Approved Sheet Metal assist with complicated prototype projects, and how can we get started?
Case Study: Sand Blasting Unit for Industrial Manufacturing

Step 1: Choosing the Material
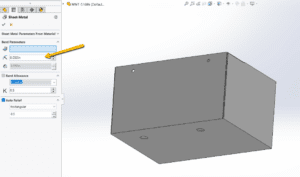
Most of our projects begin with selecting the right material. Working closely with the end customer, our engineering team calculated the proper material thickness for the prototype. Once we had the perfect gauge, we purchased the material and moved on to the next step.
Step 2: Notching, Tabbing, and Welding
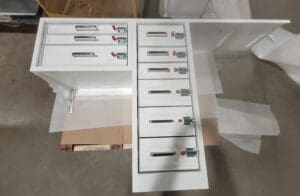
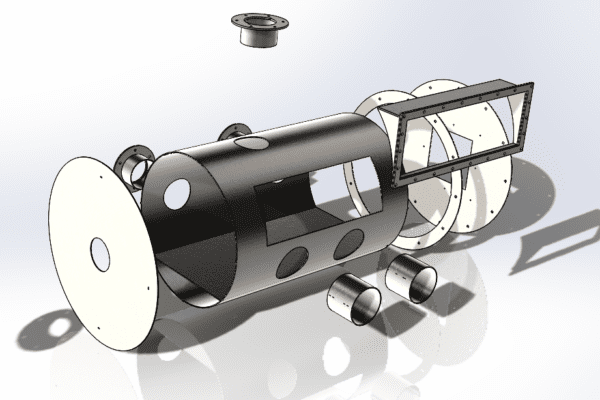
The next challenges were notching and tabbing. Our engineering team crafted their magic on the flat sheet metal waiting to be formed into a specialty sand blasting unit. Starting with one solid body more, we ended up with 16 individual parts that our team laser-cut and formed. But the challenges didn’t end there.
We knew all gaps had to be welded .007” apart at the very most. Our master welder, Gerald Fanning, brought in his over 20 years of expertise and snapped the parts together with ease and confidence.
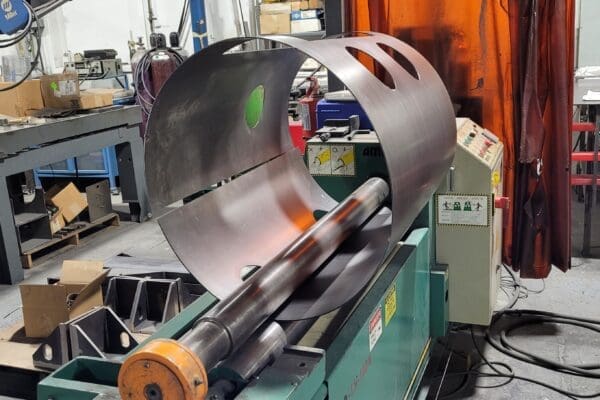
Step 3: The Power Roller
Because the part was cylindrical, we used our power roller to fabricate the main body of this complex prototype. Power rollers, also known as plate bending rolls, produce smooth, circular bends in sheet, strip, or coiled stock. Metal is fed between successive pairs of rolls that progressively bend and form it until the desired shape and cross section is obtained. The radius of the bend can be adjusted by changing the location of the rolls. These machines are normally equipped with instant start, stop, and reverse controls.
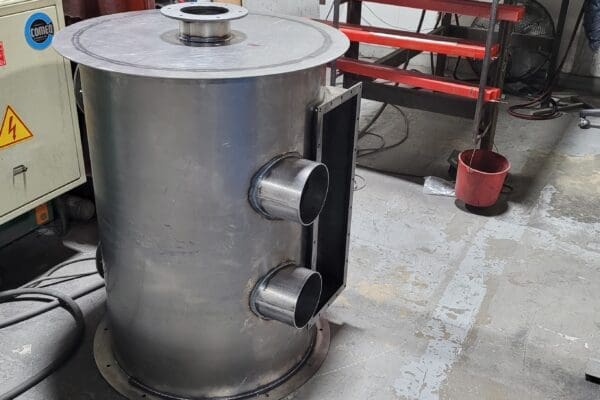
At the end of this process, we had a perfectly formed sand blasting unit and received great feedback from the end-user. Our sheet metal shop made this part in just 15 days! How’s that for rapid prototyping?
Are you working on a complicated prototype? We love a good challenge! Contact us today and let’s get started.
Sheet Metal Design for Manufacturing
FREE eBOOK DOWNLOAD
Design parts with the sheet metal fabrication process in mind. Reduce cost and get parts on your desk faster! Learn about the following best practices when designing sheet metal parts:
- Hems & Offsets
- Notches & Tabs
- Corners & Welding
- Uniform Thickness and more!
")
Notching, Tabbing, and Rolling a Complex Part FAQ
The first step in the fabrication process was choosing the right material. Working closely with the end customer, our engineering team calculated the appropriate material thickness for the prototype and acquired the perfect gauge.
Notching and tabbing were key challenges in the fabrication process. The engineering team transformed a flat sheet of metal into 16 individual parts, laser-cut and formed. These parts required welding, with gaps between welds being no more than 0.007". A master welder with over 20 years of experience accomplished this with expertise.
The main body of the complex prototype was fabricated using a power roller, also known as a plate bending roll. This machine produces smooth, circular bends in sheet metal, allowing for the formation of the desired shape and cross-section.
The sandblasting unit prototype was completed in just 15 days, demonstrating rapid prototyping capabilities. The end-user provided positive feedback on the quality and functionality of the prototype.
Absolutely, we love a good challenge! If you're working on a complicated prototype, you can contact us to discuss your project and get started with our fabrication services. We're here to help bring your concepts to life.